How to Clean Carrier Air Conditioner Coils? Expert Tips!
For efficient performance and longevity, clean your Carrier air conditioner coils. Dirty coils reduce cooling efficiency, increase energy consumption, and obstruct airflow. Maintenance saves you money on energy bills by keeping your unit running efficiently.
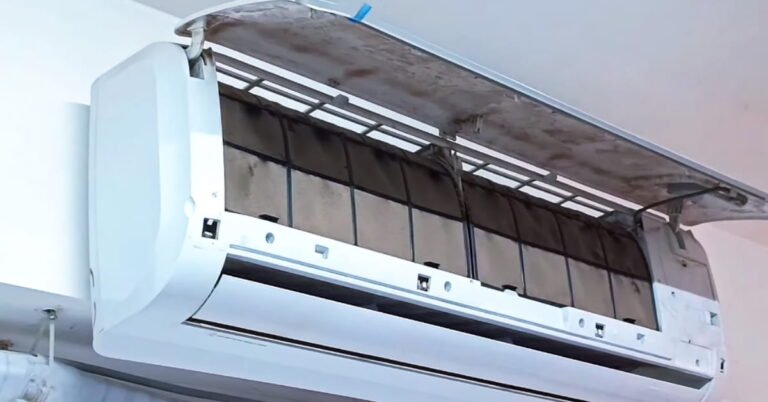
Remove the outer casing of the Carrier air conditioner to clean the coils. Clean dirt and debris with a soft brush or vacuum. Use a commercial coil cleaner to remove stubborn grime. Let the coils dry before reassembling.
Clean your coils regularly to keep your air conditioner running smoothly. The following steps will guide you for cleaning carrier air conditioner coils.
1. Tools And Materials Needed For Cleaning
Make sure you have the right tools and materials before you start cleaning. A smooth cleaning process is ensured by having everything ready. This section describes the tools and safety equipment you will need.
List Of Required Tools
Several essential tools are needed to effectively clean Carrier AC coils. With these tools, you can reach and clean the coils easily.
1. Screwdriver: To remove the coil panel, use a Phillips or flat-head screwdriver.
2. Fin Comb: It helps straighten bent coil fins.
3. Coil Cleaner: This is a specialized cleaner designed for cleaning coils in air conditioners.
4. Soft Brush: Use this brush to gently scrub your coils.
5. Vacuum Cleaner: Dust and debris can be removed by attaching a brush attachment to it.
6. Garden Hose: This is used to rinse off the coil cleaner from the coils.
7. Bucket: It is used to hold water or cleaning solutions.
Cleaning will be easier and more efficient with these tools. Make sure all tools are in good working order before using them.
Safety Equipment
When cleaning your AC coils, safety is paramount. The right safety equipment protects you from potential hazards.
- Safety Glasses: Protects your eyes from debris and cleaning chemicals.
- Gloves: Protect your hands from chemicals and sharp edges with rubber or latex gloves.
- Face Mask: Prevents inhalation of dust and chemical fumes.
- Protective Clothing: Wear long sleeves and pants to protect your skin from splashes and scrapes.
- Non-Slip Shoes: For working around the device, these shoes provide good footing.
2. Preparation For Cleaning
A good prep ensures a smooth cleaning process. In this section you will be guided through the necessary steps.
Safety Precautions
Be sure to take the right safety precautions before cleaning the coils. Make safety your top priority at all times. Here are some key points to remember:
- Turn off the power: Make sure the main circuit breaker is off before turning off the air conditioner. This prevents any risk of electric shock.
- Wear protective gear: Use gloves and safety goggles to protect your hands and eyes from dust and cleaning agents.
- Read the manual: Refer to the Carrier air conditioner manual for specific safety instructions and guidelines.
- Ventilate the area: Ensure the room is well-ventilated if you are using chemical cleaners. Open windows and doors for proper airflow.
Accessing The Coils
Accessing the coils of your Carrier air conditioner requires some careful steps. To reach the coils safely, follow these instructions:
- Remove the front panel: Unscrew the front panel of the air conditioner to expose the internal components.
- Locate the coils: Identify the evaporator and condenser coils. Outdoor units have a condenser coil, while indoor units have an evaporator coil.
- Check for debris: Any visible debris or dirt buildup on the coils should be checked before cleaning.
- Use a soft brush: Gently brush away any loose dirt or dust from the coils. Be careful not to damage the fins.
You need to access the coils properly to clean them. Your air conditioner’s efficiency and performance depend on this step.

3. Cleaning The Evaporator Coils
Dirty coils can reduce cooling performance and increase energy consumption. Follow these steps to clean the coils effectively:
1. Brush off loose debris: Use a soft brush to gently remove dust and dirt from the coils.
2. Apply coil cleaner: Spray a coil cleaner evenly across the coils. Ensure that you cover all areas.
3. Let it sit: Allow the cleaner to sit for the recommended amount of time. By doing so, you will be able to break down the grime.
4. Rinse the coils: To rinse off the cleaner, use a garden hose or spray bottle. Remove all residues.
5. Vacuum the area: Use a vacuum cleaner to remove any remaining debris around the coils.
Proper cleaning ensures the coils are free from dirt, enhancing the unit’s performance.
Reassemble The Unit
After cleaning, reassemble the unit carefully to ensure it works correctly. Follow these steps:
- Dry the coils: Ensure the coils are completely dry before reassembling. Use a clean cloth to wipe off excess moisture.
- Replace the access panel: Align the panel correctly and secure it with screws.
- Reconnect the power: Turn on the power to the unit and check for proper operation.
When the unit is reassembled correctly, your home will receive optimal cooling.

4. Cleaning The Condenser Coils
Now, we will focus on cleaning the condenser coils, which play a key role in the cooling process. Here are the steps to clean the condenser coils:
1. Use a soft brush to gently remove loose dirt and debris from the coils.
2. Apply a commercial coil cleaner or a mixture of mild detergent and water.
3. Let the cleaner sit for 5-10 minutes to break down dirt and grime.
4. Make sure the fins are not damaged by rinsing the coils thoroughly.
5. Ensure all cleaning agents are completely rinsed off to avoid any residue.
Always follow the manufacturer’s instructions for any cleaning products used. This ensures that the coils are not damaged during the cleaning process.
Reassemble The Unit
After cleaning the condenser coils, the unit must be reassembled. When you properly reassemble your air conditioner, it operates efficiently.
Follow these steps to reassemble the unit:
- Reassemble the coils after they have dried.
- Remove the outer casing or grille carefully.
- Inspect and secure any screws or fasteners removed.
- Turn on the air conditioner and check for proper operation.
- Be aware of any unusual noises.
The air conditioner must be reassembled correctly to operate efficiently. Double-check all connections and components to avoid any potential problems.
Conclusion
A clean coil improves air quality and lowers energy bills. Carrier air conditioner coils need to be cleaned regularly to maintain efficiency. Keep your Carrier air conditioner in good condition by following these steps. For some years to come, you will receive reliable and efficient cooling from your air conditioner.

